Thursday, December 04, 2008

throwing snow


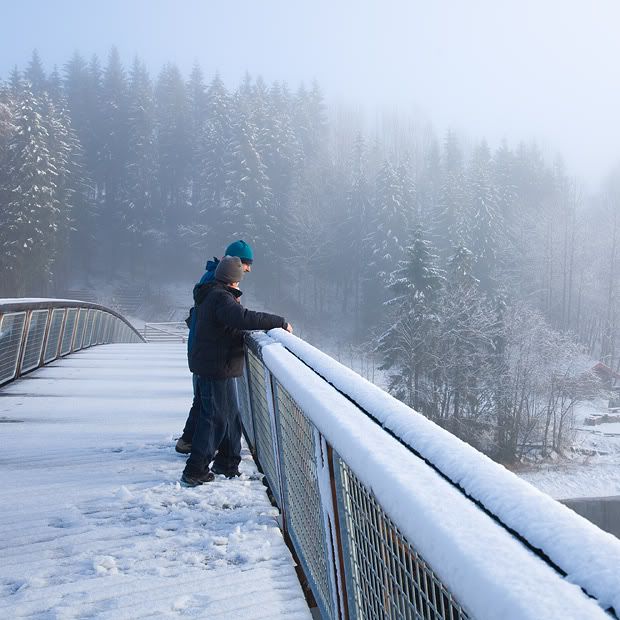
they are warming themselves up by throwing the packed snow into the river

and that's how the bridge looked before we put out footprints all over it and took all the snow off

Wednesday, December 03, 2008

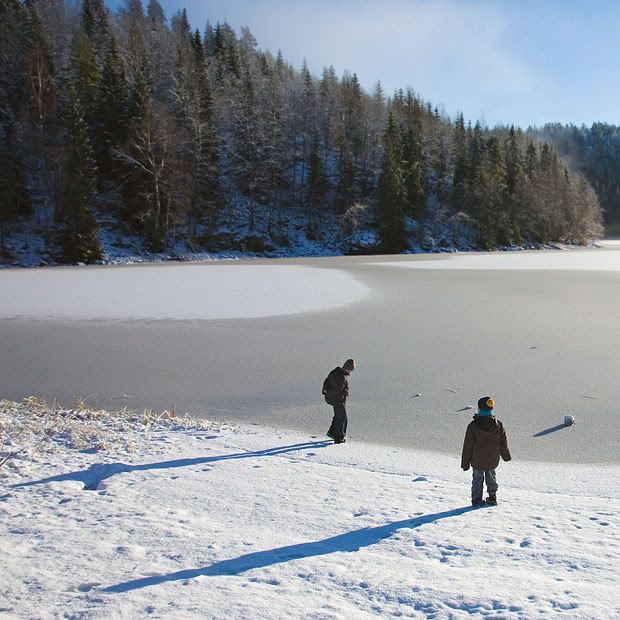
long shadows - Norway

boys on the shore of the frozen lake. They loved it. The biggest hit with them was trying to break the ice (still thin) by throwing stones. I don't think they managed to do it even once

Tuesday, December 02, 2008

upwards diagonal


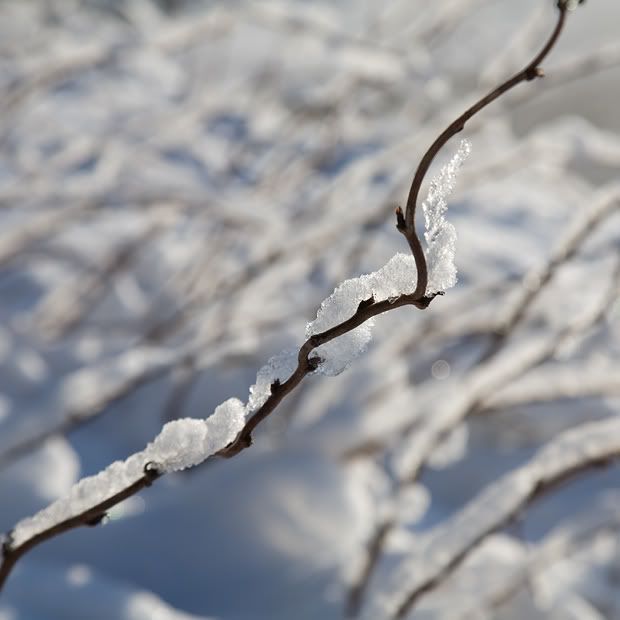
when we only just started our walk around the lake, all those twigs were covered in snow. On our way back sun got to them already and they were bare again

Monday, December 01, 2008


went to Norway with boys over this w/e. We were vary lucky with the weather - it snowed the first day and was sunny on the second. Mist was hanging everywhere, in some places forming a blanket a few meters above whatever surface there was - lake, field, whatever

saw for the first time in my life something that is apparently called "fogbow" - a white bow, like a rainbow, but with no visible colors. It appeared while Francesco drove us through a valley filled by fog. Sun was behind us and to the left and there was this white arch in front to the right. Apart from not having color, it also appeared "closer" than a rainbow would be - I could "see" where the end of it were touching the field, maybe 30 meters away

http://en.wikipedia.org/wiki/Fogbow

Wednesday, October 08, 2008

spot in the sun


it was a lovely day today. I went for a walk in Wandlebury. when I happened on this bench that was in the sunspot at that exact moment, I was really sorry there was no-one to sit there with me

Monday, September 29, 2008

pale seascape with red sail


according to weather people, "summer has finally arrived", so went to Southwold yesterday. It was a lovely day and seaside was full of people, families with kids, bikers (passed a big group pf Harleys on A11), and especially older people, mostly couples, having teas, fish and chips and icecreams. It's so touching to see them there, keeping each other company

Thursday, September 25, 2008

Wednesday, September 24, 2008

quick sketch


I am still struggling with adobe illustrator, but making simple strokes seems tremendous fun

Monday, September 22, 2008

red belt


my youngest got himself a first colored belt in karate on saturday

look at him there

Tuesday, September 16, 2008

Japanese anemone


got two of those in my garden - one white, one pink. they both are blooming beautifully now

isolation done using the methid described here

Friday, September 12, 2008

more physalis


square crop from a full vertical format. full vertical format can be seen here

Thursday, September 11, 2008

Isolation on white without a lightcube


Shooting small object for isolation on white is best done in a lightcube + light, however, for this and that reason I've choosen not to purchase one. Instead, I have a setup that is assembled within one minute, is stored btween my computer table and the wall, and costed me nothing (had everything in place).
You will need a few big sheets of white paper, a pig piece of glass (mine came out of a broken picture frame) + chairs, footrests, piles of books or whatever to support the pieces. For light I use sunlight from the balcony door.

Apart from being cheap, light, and compact, the setup gives my pics a sunny appearance, that most people find pleasing to the eye.

on the minus side, the shooting sessions can only be done in good weather and in the right time of the day. which in fact is a kinda plus - it energize you no end when the conditions are right


ok, so there is the setup. the cleanest, whitest bit of paper is laying flat on the floor. on the sides are two stools, and leaning on them vertically - two more pieces of paper (they reflect the light back into the working area and screen possible "color contamination" from the sides). On the top of the stools the piece of glass is resting. Behind the whole thing is a big piece of paper/cardmoard, standing vertically - another screen/reflector.

That's it.

You can photograph stuff, laying objects on the glass - easiest possible situation for isolation. If that's impossible, take off the glass, put the object on the paper on the floor and make sure there is absolute minimum of shadows in the frame. It will be slightly more fiddly, coz you'll need to get rid of the shadows in photoshop, or similar software, but it will still be relatively easy.

When I shoot in this setup, I put exposure on up to +2 - the idea being that I can "burn" the background anyway. The main thing to watch out for is that the object itself retains enough details.

Ok, let's say I shoot a tulip (laying flat on the glass). The following processing is done using photoshop elements
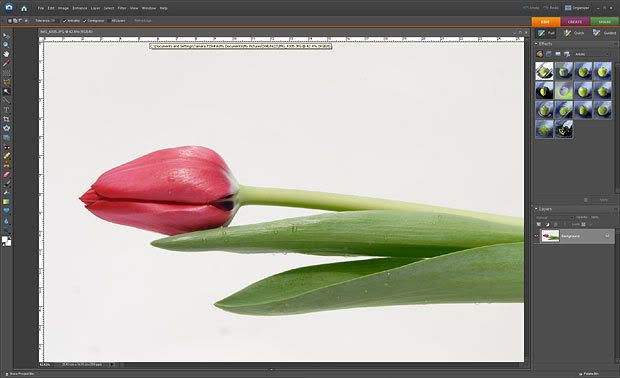


first, crop close to the object, we don't need to think about the rest of the background
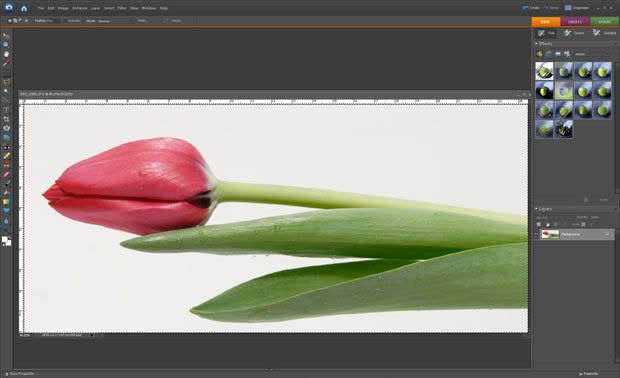

Fist, light up the pic - call levels (ctrl-L), and, looking at the highlight in the tulip and making sure it is not burning, bring the right arrow into the histogram, till satisfied with the results.
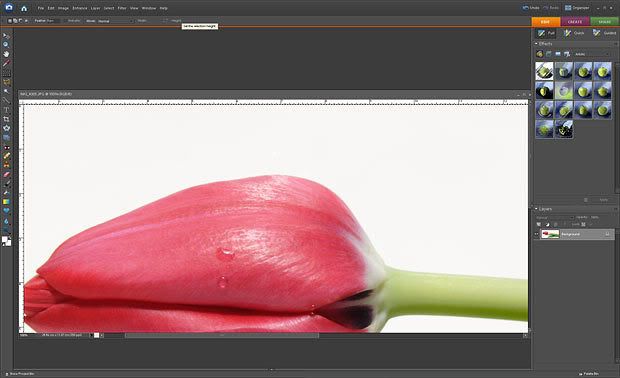


Now. Looks like it worked ok. So, bring the middle arrow (midtones) to the maximum right. your pic becomes horribly dark (and yes, I know, I had a very dirty sensor at that point)
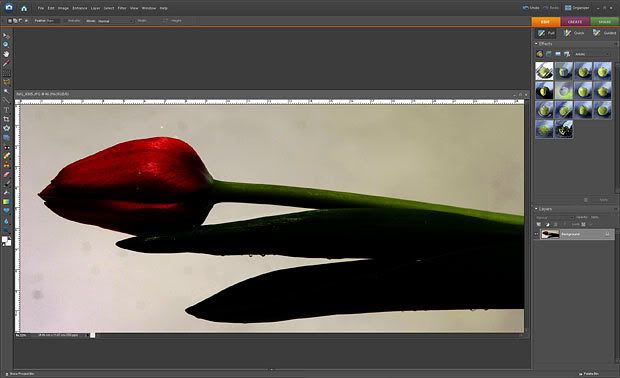

Now, WITHOUT CLOSING THE LEVELS DIALOG WINDOW, take the white eyedropper from it, and click on the area of the background that appears the darkest. It will bring this area to pure white, taking the whole picture with it
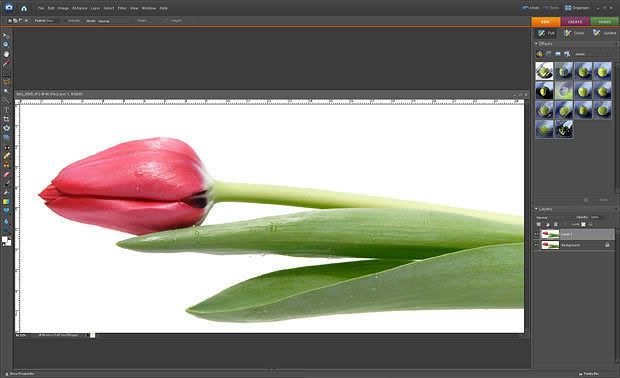


ta-da! looking good. to check, you can, for example, "ok" this levels dialog, and call another one - bring the middle arrow to the right again, you should still have white background and very dark object. cancel this dialog. If there are still some big area of background that is not white, repeat the step with eyedropper.
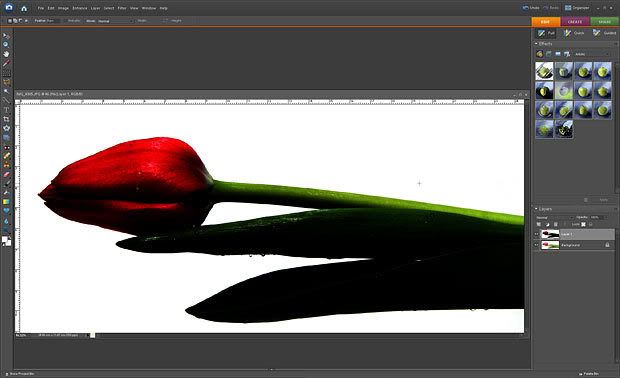


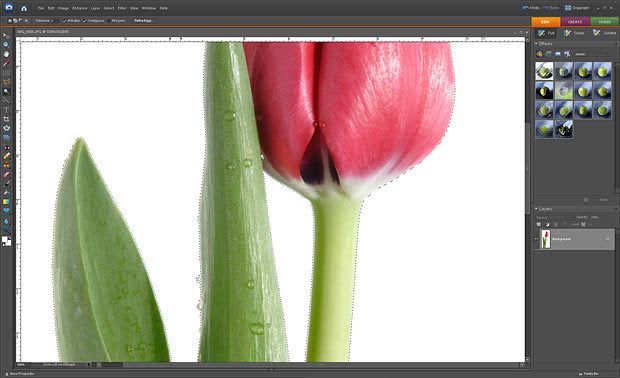
ok - looks fine in this case, and the flower doesn't burn at all. To re-check, use the magic wand with "0" tolerance, you should be able to select the whole background area in one swoop.


in my case there are no problems, but if you have some dirt left somewhere - take the erazer and get rid of it.

tulip is a simple shape, you can theoretically do the isolation even by hand - with lasso and all. The beauty of the method described is that you can isolate more complicated shapes just as easily
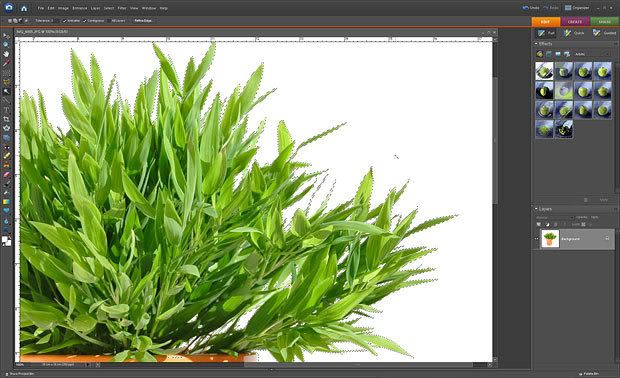

I have some tutorials on more complicated cases, which I might eventually translate, originals are in russian

final pic in a Russian photobank "Lori"

original of this tutorial in Russian
Sunday, September 07, 2008

collaging pen-and-ink drawing with paper textures

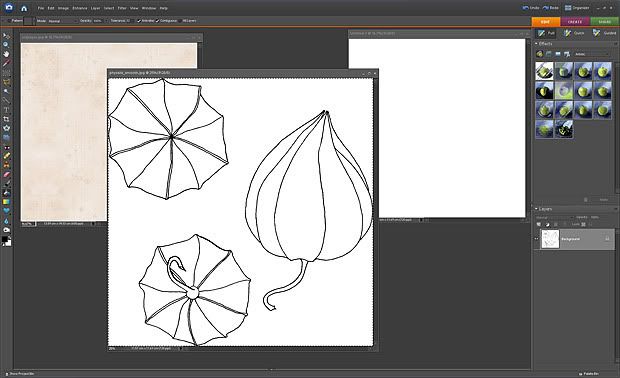
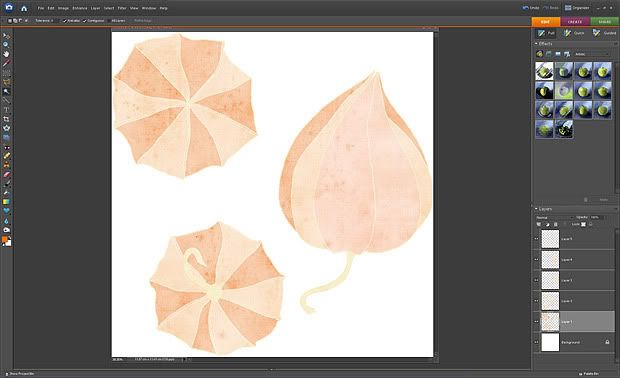
To assemple a collage like one below, I use pen-and-ink drawing on paper, which I scan. All lines should be completed, all segments of the drawing fully encircled by lines


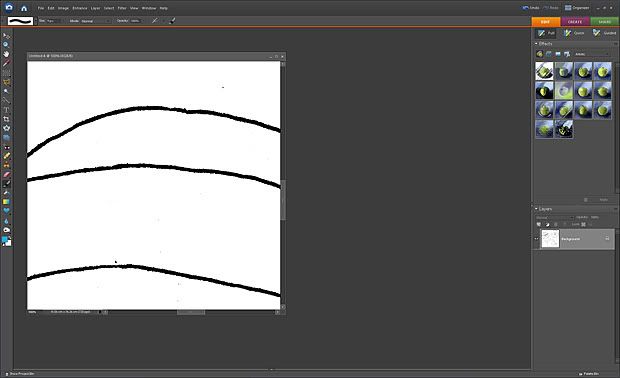
after maximizing the contrast and removing stray color, the scanned lines are never smooth


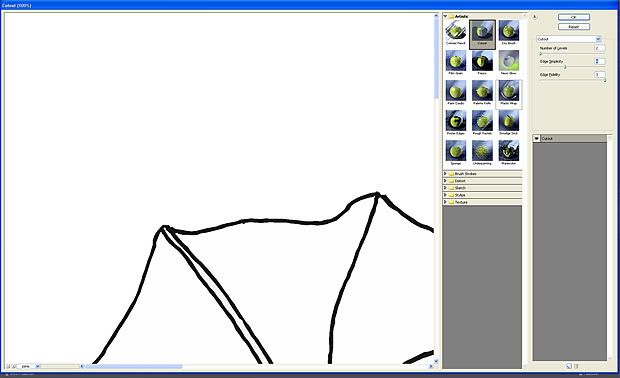
since I don't have full Photoshop (too expensive), I can't use pen tool to make the lines smooth. So I use the cutout filter first, and then use levels (Ctrl_L) to make the drawing black and white (after cutout it will have some grey areas). To make the drawing a bit softer, do a select of black or white areas, refine the edge as you wish, making the lines either thicker or thinner, and feather the edge, then use levels to adjust the edges

и потом догоняем уровнями то, что получилось серым до белого. где-то я уже описывала

now, open two more files files - one with choozen texture, left (I tend to use my collection of old scanned old paper) and one with simple white background (right). for convinience, make them same size as the drawing


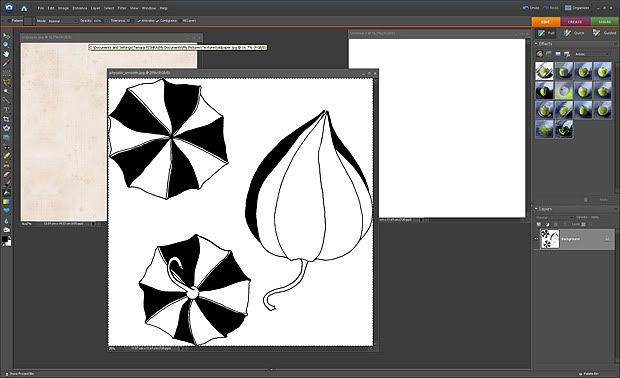
now choose some segments in the drawing. because we are filling the drawing with texture in few steps, it makes sense to choose those segments that are "further" away from the viewer. other segments will lay on the top


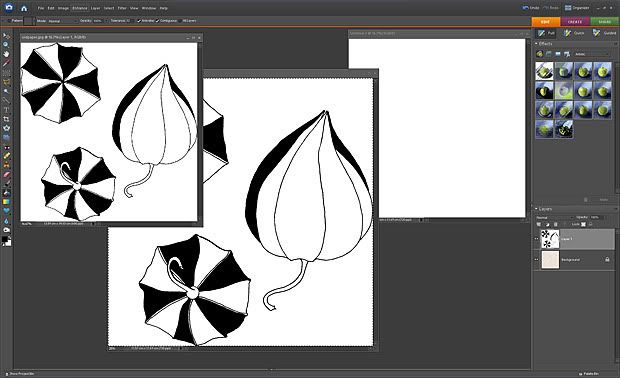
copy the whole thing onto the file with texture (Ctrl-A, Ctrl-C, move over to the texture file - Ctrl-V). This creates a new layer with our partially filled drawing on the top of the original texture


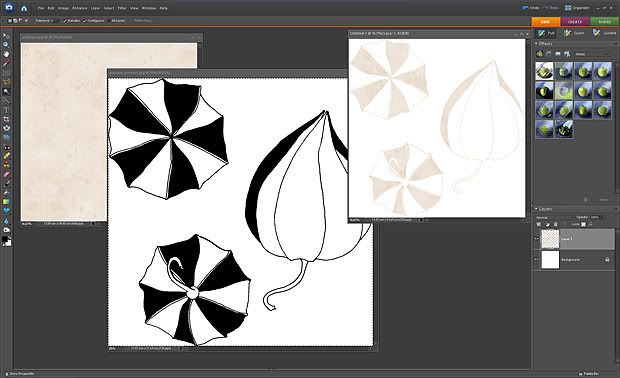
now, choose and of the black areas in the drawing with magic pen. add the rest of black areas with "similar". move to the lower layer, one with texture, and copy the selected area from there (ctrl-c). move onto the blank file on the right. drop the selected areas of texture there (Ctrl-V)


Now go to the original drawing in the middle, and remove the black areas (Ctrl-Z and many times as necessary).

Repeat the process from filling with black to clearing the black areas, choosing different segments every time
now the complete draing is filled with textures, and segments are spread in a
few different layers. Using levels(ctrl-L) and color tool (ctrl-u) in every layer separately, adjust the light and color for all of them (can be changed at any time, don't worry)


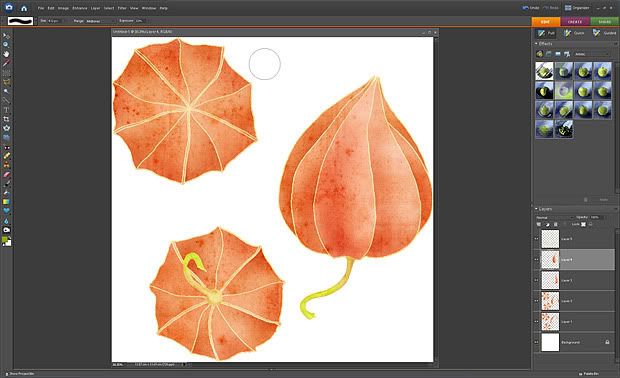
Now, using burn and dodge tools, and working on each layer separately, add shadows (burn) and highlights (dodge)


Now, because we've started with line drawing, there are many layers of multicolored lines over each line of the original drawing. I used to leave those as is - see http://hiero.ru/2099348, http://hiero.ru/2097030, http://hiero.ru/2096677

Now I remove the oven that don't belong to each level with eraser

Once the result satisfy you, merge the layers. The resulting pic on white background can be used as is, or dropped on a top of some texture. The handwritten legend here was also scanned and dropped on the top as described above

Saturday, September 06, 2008

physalis


physalis - pen-and-ink hand drawing collaged with paper textures in PS elements. tutorial is here - it's in Russian, but you can probably work it out from the pictures

Friday, September 05, 2008

ipoemea


it's raining and it's raining, and my morning glory choose this moment to finally start blooming. odd that.

had no choice but to draw and collage instead of photograpy

Tuesday, September 02, 2008

simple square


simple picture from Portugal

the beauty of sailing as a hobby is that you give other people something beautiful to look at. that's my point of view, at least. I am a photographer, and I don't sail :)

long horizontal crop of the same pic

Monday, September 01, 2008

ammonites. well, not really


what you've finished all your holidays reading, you have to find something else to do on the beach

simpler design and smaller designer here. same photographer, though

Friday, August 29, 2008

back from Figueira da Foz


I figure perfect place for "just being lazy" holidays.
and when the ocean is not safe to swim, at least you can watch the waves.


beach in Figueira da Foz is astonishingly wide, you have to walk and walk and walk from where the sand starts to the water. fortunately, there are wooden walkways almost the whole width of the beach

Sunday, August 17, 2008

snowy owl


spend a few happy moments photographing this owl. it turns its head amazingly fast

Snowy Owl (Bubo scandiacus) flexes its neck for you

Saturday, August 16, 2008


went to the pick-your-own farm today. no plums this year :(
but it looks like there won't be any shortage of apples

highflyer


my older son scared some garments off me, by jumping off the swing on the highest point he can reach.

to be perfectly honest, of course we did the same when his age.

fortunately (for me) construction of that swing prevents him from doing full circles around the pivot (exercise called "full sun" in our neck of wood)